Flashing your NodeMCU
NodeMCU always comes to my mind (just like Arduino) while I think about any project related to the Internet of Things. I know, Arduino is a way better than NodeMCU. Lots of libraries, portability, and you can plug to almost all anything.
Anything?
Yes, Anything!!
Well, the only reason I prefer NodeMCU over Arduino UNO is the inbuilt WIFI module (ESP8266) NodeMCU comes with.
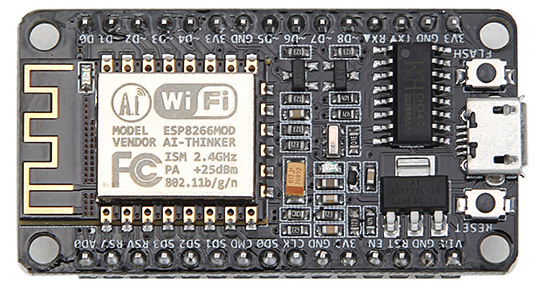
The ESP8266 is also available as a standalone WIFI module, which you can connect to most of the Microcontrollers. But most of the Microcontrollers use 5v as default compared to 3.3v of ESP9266.
Arduino UNO isn't compatible due to its 5v only outputs. There's a 3.3v output though, but the current generated from that isn't enough for the ESP8266 module.
So, then you can use the standard 5v output and regulate the current using a Voltage Regulator that converts the 5v to 3.3v. This also assures that enough current will be provided from the output.
You can use the Voltage Regulator(AMS1117) which converts 5v to 3.3v. If you don't have a Voltage Regulator, you can use a Potentiometer. Using a potentiometer is a bit harmful that it could damage if there's any rise in voltage.
There's a lot of things to do even after you have done your wiring.
This could be said for a reason that I simply prefer NodeMCU over Arduino + ESP8266.
Why don't you simply pick NodeMCU over Arduino + ESP8266 which ignores all the problems requirements mentioned above?
Well even in NodeMCU you must do some simple(software side) steps that are most often confused.
Steps that you must do: 0. Update your Firmware 1. Verify your Firmware
- Test with a small Program
UPDATE YOUR FIRMWARE
Download esptool either as a zip file or using git clone.
git clone https://github.com/themadinventor/esptool.git
- Connect the NodeMCU via USB cable to the computer.
Make sure you have python2.7 installed, open a terminal and type
sudo python setup.py install
- Download the latest NodeMCU firmware from here. You could find nodemcu\_integer\_*.bin at the end of the page.
Flash the firmware using the following command.
sudo python2 esptool.py --baud 460800 --port /dev/ttyUSB0 write_flash
-fm dio 0x00000
/home/monster/Downloads/nodemcu_integer_0.9.6-dev_20150704.bin
If that worked, you are good to go
[monster@monster esptool]$ sudo python2 esptool.py --baud 460800 --port /dev/ttyUSB0 write_flash -fm dio 0x00000 /home/monster/Downloads/nodemcu_integer_0.9.6-dev_20150704.bin
esptool.py v2.3-dev
Connecting....
Detecting chip type... ESP8266
Chip is ESP8266EX
Uploading stub...
Running stub...
Stub running...
Changing baud rate to 460800
Changed.
Configuring flash size...
Auto-detected Flash size: 4MB
Flash params set to 0x0240
Compressed 450072 bytes to 290528...
Wrote 450072 bytes (290528 compressed) at 0x00000000 in 6.6 seconds (effective 543.0 kbit/s)...
Hash of data verified.
Leaving...
Hard resetting via RTS pin...
[monster@monster esptool]$
VERIFY YOUR FIRMWARE
- Install the CP2102 driver from here.
Then extract the tarball and run the makefile
[monster@monster ~]$ tar xvzf '/home/monster/Linux_3.x.x_4.x.x_VCP_Driver_Source.tar.gz'
[monster@monster ~]$ cd Linu*Source
[monster@monster Linux_3.x.x_4.x.x_VCP_Driver_Source]$ make
make -C /lib/modules/`uname -r`/build M=/home/monster/Linux_3.x.x_4.x.x_VCP_Driver_Source modules
make[1]: Entering directory '/usr/src/kernels/4.14.16-300.fc27.x86_64'
  Building modules, stage 2.
  MODPOST 1 modules
make[1]: Leaving directory '/usr/src/kernels/4.14.16-300.fc27.x86_64'
[monster@monster Linux_3.x.x_4.x.x_VCP_Driver_Source]$
Additional Configurations
[monster@monster ~]$ modprobe cp210x
[monster@monster ~]$ export DISPLAY=:0
[monster@monster ~]$ xhost + localhost
[monster@monster ~]$ export DISPLAY=":0.0"
[monster@monster ~]$ xhost +local:all
[monster@monster ~]$ xhost +inet:<your_ip_address>
- Download ESPlorer from here.
Run the ESPlorer using the following command.
[monster@monster ~]$ cd ESPlorer
[monster@monster ~]$ sudo java -jar ESPlorer.jar
- This the window you'll be getting
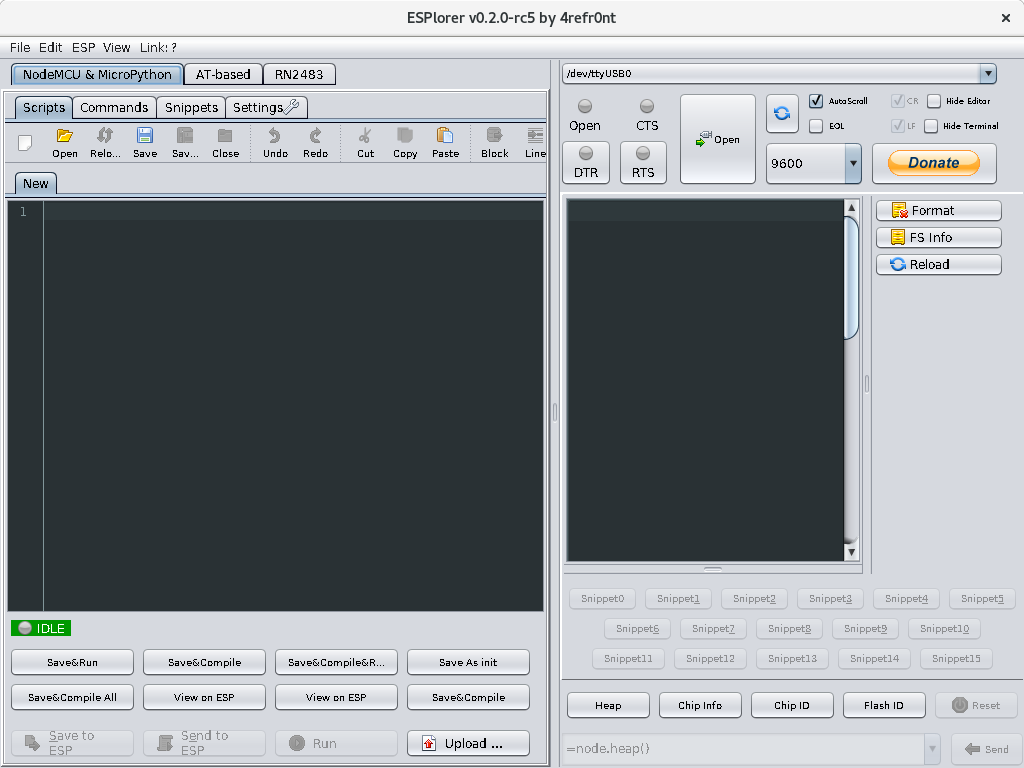
- Select the /dev/tty*(your USB NO., Mine is /dev/ttyUSB0) and set the baud rate to 9600. Then click the "Open" button in ESPlorer Configuration.
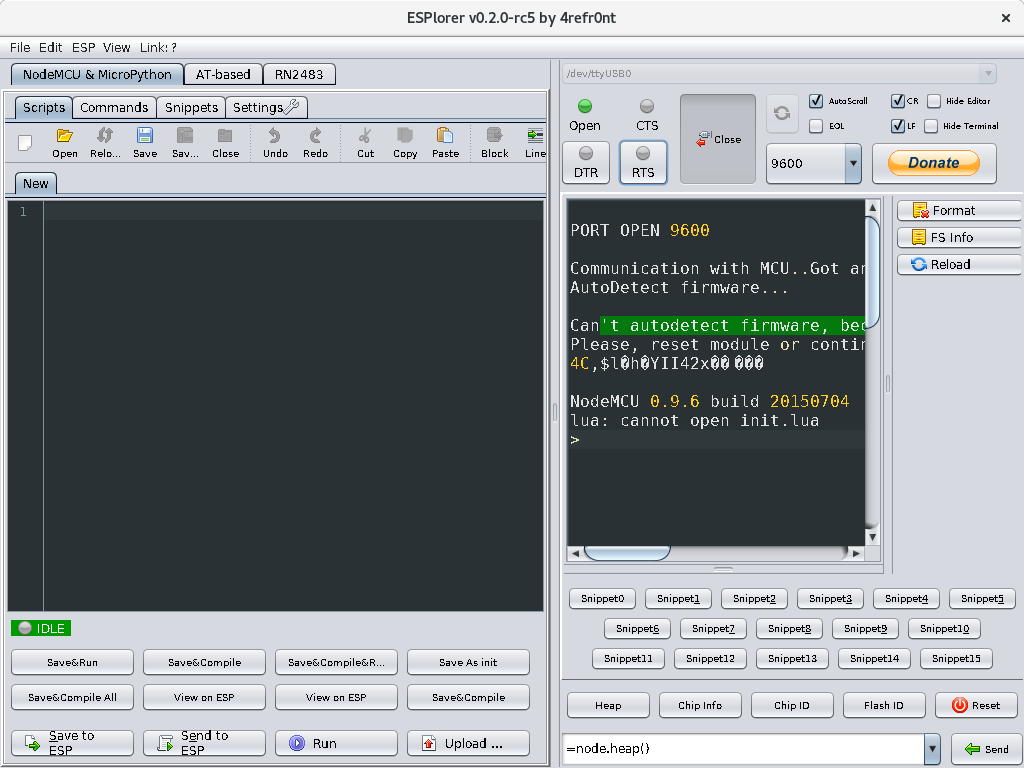
- Push the RST button on the ESP8266(two times), it is right next to the micro-USB port.
- You should now see a message
FINAL PROGRAM
NodeMCU uses Lua programming language, which is a cross breed of
Node.js and python. When booting the device will look for a file called init.lua and executes the file.
- Click the Format button to delete all the files.
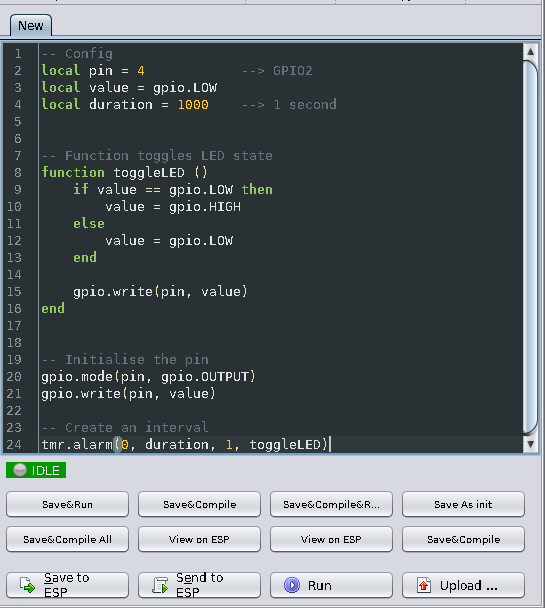
Copy/paste the following code
-- Config local pin = 4 --> GPIO2 local value = gpio.LOW local duration = 1000 --> 1 second -- Function toggles LED state function toggleLED () if value == gpio.LOW then value = gpio.HIGH else value = gpio.LOW end gpio.write(pin, value) end -- Initialise the pin gpio.mode(pin, gpio.OUTPUT) gpio.write(pin, value) -- Create an interval tmr.alarm(0, duration, 1, toggleLED)- Save the file as
init.lua.
- Now the blue onboard LED should blink on and off every second. If you restart the device, it will load the init.lua file and keep on blinking.

- If the LED doesn't blink, then you can do normal
upload,"Save to ESP","Send to ESP"and clickRun.